Monday, October 28, 2013

CHOCOLATE CAKE with VANILLA BUTTERCREAM ICING


I have been thinking about making this cake for a long time now. What made me change my mind every time I thought of making it, was the buttercream icing part. I was really worried about how it would turn out. In the hot and humid climate here, there are chances that the icing would fall back immediately after whisking, or wouldn’t rise at all. It might even split and the whole thing would be a mess. I also had been searching for an easy buttercream recipe, and found one that requires you to heat the egg whites and sugar mixture. So, I thought it might just work, and it did!

In today’s time, a cake is the epitome of celebration, and you just don’t make a big cake any day you want. So, I also needed a special day when I wouldn’t mind giving into the little laborious job that it is. Today, being the 6th anniversary of the day I signed the legal papers with the Mister, it called for me to brave into the kitchen and finally put the thoughts into action. The result was delicious!


I followed Nigella's Old Fashioned Chocolate Cake recipe to make the cakes.  

Ingredients for the cake : 

  • Plain all purpose Flour - 1 1/2 cup or 200g,
  • Caster Sugar (or just powder your grainy sugar) - 1 cup or 200g,
  • Cocoa powder - 1/2 cup or 50g,
  • Sour Cream (substitue with thick yoghurt) - 2/3 cup or 150ml,
  • Butter (soft, at room temperature) - 175g,
  • Eggs (at room temperature) - 2,
  • Vanilla extract /essence - 2 tsp,
  • Baking powder - 1 tsp,
  • Baking soda - 1/2 tsp.

This makes 2 cakes to be sandwiched. If you want to add a third layer to the cake, like I did here, just make another cake with half the quantity listed. Also, for the third layer, I ran out of yoghurt. So, I added some fresh cream insted. Turned out to be just as good.


Now, I don't have a conventional oven. I happen to own a Convection+Microwave+Grill oven, and I bake my cakes, one at a time, in the convection mode. So, what I did was, I didn't add the raising agents to the cake batter right away. I divided the batter into two portions, covered and set aside one, and to the other half, I added 1/2 the amount of baking powder, and baking soda, poured it in the tin and baked. When I was done with the first one, I baked the second one similarly.


Method:

  • Pre-heat the oven at 180°C.
  • Line and grease 2 cake tins.
  • Cream the butter and sugar. Add the eggs, vanilla, and the sour cream, and mix it all up with a whisk.
  • Mix in the cocoa powder, the flour, the baking powder, and the baking soda, and make a smooth batter. If you find the batter very thick, you can add a couple of tablespoons of milk.
  • Or you can just mix it all up together in a food processor.
  • Pour the batter in the two lined and greased tins, and bake at 180°C for 30-35 mins.
  • Take it out, and allow it to cool down completely.
If you are not going to ice the cake right away, cover them with cling film after they have cooled down, and refrigerate.


To make the buttercream icing, I followed a Martha Stewart recipe. The original recipe had food colour in it. I omitted that as I wanted a white icing to go with the chocolate cakes. You may add a little gel or paste (as the original recipe suggest, to avoid streaking or flaking) food colour of your choice. Just mix it in to the buttercream with a skewer.


To prepare the buttercream icing, you will need:

  • Eggs (separated, just the whites)- 5,
  • Caster Sugar (you really need the superfine sugar here) - 1 1/4 cup,
  • Butter (soft, at room temperature) - 350g,
  • Vanilla extract - 2 tsp.


Here's what you have to do:
  • Bring half a saucepan of water to boil, and then turn the heat down to a low simmer.
  • Take the egg whites and sugar in a bowl that fits over the sauce pan, place it over the simmering water, and whisk the egg whites and the sugar. The bowl SHOULD NOT touch the water.
  • Keep beating /whisking till the mixture gets a little warm, and the sugar melts. It takes around 3-5 mins.
  • Now take the bowl of the heat, and immediately start whisking with an electric whisk on medium-high setting. Keep going for a good 7-8 mins, till the mixture is light and fluffy.
  • Now bring the speed down to medium, add the vanilla, and start incorporating the butter, one tablespoon at a time.
  • There, you have your vanilla buttercream ready! You can store it in the fridge in an airtight box.


To layer the cake:


  • Place a cake over your cake stand or serving dish, spread over some icing in an even layer, and place the other cake gently on top. Spread some icing evenly over it.
  • Repeat if you are adding another layer.
  • With the help of a spatula spread the rest of the icing over the cake and on the sides, cover it up as evenly as possible. If you've got the fancy tools, use them to make the cake look smooth.
  • Decorate your cake with some sugar flowers or however you like. 
 
Chill well in the fridge before cutting and enjoying your slice.
Ciao!

Tuesday, October 22, 2013

KHICHURI with BADHAKOPI-r CHORCHORI and BEGUNI


Pujo is over and it has been a week since Maa Durga has left for her Himalayan abode. Yet, Bengalis, I believe, are still far from getting over the festivity. We are in no hurry to let go of the fun and merry making, not until before Diwali. The Bijoya visits will continue, and so will the feasts. So, when I got the chance on a rainy like today, I thought of going easy on lunch, reminiscing the Pujo-r Bhog.


 Khichuri or Khichdi is a very common dish and is in everybody's comfort food list. Having said that, its not on mine. Everybody has their own way of making it. I make it with Gobindobhog rice, and Yellow Moong dal (the washed moong dal), ususally in a proportion of 2:1. I also use Gawa Ghee at the end. It is the darker one and has a stronger aroma than the regular white/yellow ghee.

To make the Khichuri,

  • Dry roast the moong dal in a pan till fragrant and a few grains begin to turn brown. Transfer into a bowl of water and wash it nicely. Pressure cook the dal.
  • In a kadhai, saute the vegetables (I used Cauliflower, Carrots, and Potatoes) in little mustard oil. Remove them in a bowl.
  • In the same kadhai, add a little more mustard oil, and crackle some whole garam masala (green cardamom, cinnamon, cloves), and little cumin seeds, dried whole red chillies, and bay leaves.
  • Add little hing, turmeric, and some ginger paste, and cook it off. Add some chopped tomatoes, stir it in and cook for a few minutes. 
  • Pour in the dal, add cumin powder, salt and sugar to taste, the rice, sauted vegetables, and some chopped  green chillies or red chilli powder to taste, and bring it all to a boil. Then cover and cook on low heat till the rice and vegetables are done. This takes about 10 mins. Just keep stirring in between as it catches to the bottom of the pan very easily.
  • Now add the peas and cook for a further 2-5 mins. 
  • When the Khichuri is done, turn off the heat, add a big dollop of Ghee, and a little Garam Masala powder, and let it sit covered till you serve.


This Khichuri is often served with a mixed vegetable dish where all the unwanted, and low-lying  vegetables go in together, and disintegrate into a undistinguishable mass of a super-tasty curry. It is called a 'Chhyachra'. People hardly cook it for their everyday meal, and even if they do, a home cooked Chhyachra tastes very bland. It's usually reserved for special occasions where the 'thakur' cooks a large vat full of it, and I believe it tastes so divine in the 'bhog' because some of our love, and some of God's blessings go into it as well. But, that's another story for another day. The Khichuri is also served with a much more pleasant looking cabbage dish, the 'Badhakopi-r Chorchori', which I've made to go with the Khichuri.

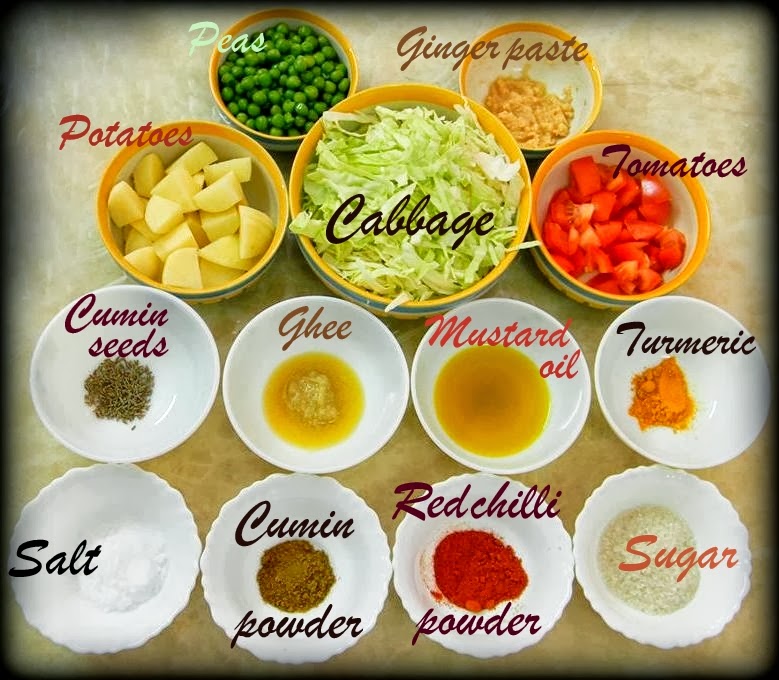
For the Badhakopi-r Chorchori,

  • Shred the Cabbage (i.e., the Badhakopi), and steam it.
  • Heat little mustard oil in a kadhai, and saute the diced potatoes, and take them out in a bowl.
  • In the same kadhai, add a little more mustard oil, if needed, and add the cumin seeds. Then add the turmeric and ginger paste, and cook the raw smell of the ginger off.
  • Add the tomatoes, stir in, and cover and cook for some 5 mins. till the tomatoes go really soft. 
  • Add the cumin powder, salt and little sugar, some red chilli powder, and stir in.
  • Add the steamed cabbage, the fried potatoes, and the peas, and mix well. Now cover and let it cook on low heat for some 15 mins. till the potatoes are done.
  • Turn the heat off, add a teaspoon of ghee, and a little pinch of garam masala powder, and let it sit covered till you serve.


The last and the most desired item to complete the savoury part of the meal / bhog is the 'bhaja' (meaning, something fried). Its basically a pakora, done the bong way. Today, we have thin slices of Begun (i.e., the Brinjal) dipped in a batter and deep fried in mustard oil.

For the Beguni,
  • Make a smooth batter with Besan and water. 
  • Add a pinch of turmeric, salt, and little Kalonji. Keep it a bit under-salted.
  • Add some cornstarch to it, and a little baking powder to it. This makes the Begunis quite crispy.
  • Dip the slices of brinjal one by one into the batter, shake off excess, and deep fry it in hot mustard oil.
  • Remove with a slotted spoon, and drain in a wire mesh / metal colander. DO NOT drain on kitchen paper as the Begunis might lose their crisp.
  • Sprinkle over some black salt. Don't wait!


Don't forget to write to us about your version of Khichuri! We'd love to share it!
Write to us at the2brokegirlz@gmail.com


Sunday, October 20, 2013

KHOIer MOWA, TIL and NARKEL NARU

     Some of you have been wondering about the inactivity here since Pujo began, we're really really glad to get your wake up calls but hey, festive season, folks!! Time to chill. And the best part is, it isn't over, yet!  Endless merry making, sometimes too much for comfort, but anyway it's the best time of the year for most people especially food lovers of all shapes and sizes.
     Today, we write about some lip smacking sweets, each of which would take a maximum of 15 mins to prepare. I had prepared these for the Lakshmi Puja at our home. Hope you enjoy making them at home and may Goddess Lakshmi shower prosperity on us all!

So, here goes the recipe for NARKEL NARU:


You will need
  • 2 Coconuts (grated)
  • Sugar 2 cups (or jaggery)
  • Khoya
  • Condensed milk (optional)
Method:
  • Grate the coconuts and keep aside.
  • Heat the kadai.
  • Add the grated coconut and sugar (or jaggery) and mix thoroughly.
  • Add the khoya and keep stirring. You can also add condensed milk if you want to make the mixture even smoother.
  • Stir a lot in order to keep binding the ingredients together.
  • When it gets sticky, take the mixture off the heat.
  • Quickly make round balls with the mixture, pressing them with your palms. Take care that the mixture doesn't cool down and solidify, in which case it will be difficult to shape them. 
Narkel Narus are done!

p.s Had to make do with sugar this time due to lack of enough jaggery at home, however my personal favorites are and will always remain- the ones made with jaggery instead of sugar! 
Jaggery is e-x-t-r-e-m-e-l-y dear to me! :D 
Anyway, let us now get down to TIL-er NARU:
You will need
  • Til (sesame seeds) 500gms
  • Jaggery 250gms
  • Oil - only for greasing palm (sounds funny, right? ;) )
Method
  • Heat a pan/kadai.
  • Add the sesame seeds and dry roast them for a bit and keep aside.
  • In the same kadai, add the jaggery and keep stirring. 
  • Add the roasted til (sesame seeds) and continue to stir until the whole mixture becomes very very sticky.
  • Take it off heat and immediately start making round balls off the mixture. Don't forget to grease your (own) hands first.
TILer NARU is done as well. Now moving on to KHOI-er MOWA...
Get hold of:

  • Khoi (a variety of puffed rice) 500gms 
  • Jaggery 300gms
Follow the steps below:
  • Heat the kadai and add the jaggery.
  • Stir extremely well until it turns as sticky as gum.
  • Take it off the heat.
  • Now add the khoi into the jaggery and mix very well.
  • Make round balls of Khoi-er mowa and devour!
SPICY TIP: You may want to add some cinnamon powder to the jaggery, for extra flavour, while heating.
Til-er naru and Khoi-er mowa served up for my dear Goddess.
Please pour in your bouquets and brickbats at the2brokegirlz@gmail.com

Friday, October 11, 2013

DURGA PUJA SPECIAL- KASHMIRI ALOOR DOM with DALPOORIE


It is that time of the year for everyone in Bengal and for Bengalees all over the world. Days of anticipation boils down to these four days of frenzy.
Today is D-Day 1, Maha Shoshti - the sixth day of the waxing moon fortnight of the month of Ashwin (Indian lunar calendar). Goddess Durga has arrived at her mother's abode with her children and here's our opportunity to revere Shakti, who symbolises the victory of good over evil. 
Let us all, with humble hearts pray for the well being of  the entire cosmos and surrender ourselves to the grace and power of Ma Durga. Here's wishing everyone of you a very happy and joyful Sharadotsav! 

Festivals are a time for gorging on yummy food as well, and today being Shoshti most Bengalee households would generally have vegetarian food. Same goes for me as well. Kashmiri Alur Dom served with Dalpoorie being today's menu. Here's the recipe for you guys.
INGREDIENTS:
  • Potatoes 8-10
  • Yoghurt - 3/4 cup
  • Ginger paste Chili paste
  • Coriander powder
  • Asafoetida
  • Kashmiri chili powder
  • Shah jeera
  • Ground garam masala
  • Cloves
  • Cardamom
  • Cinnamon
  • Bay leaves
  • Finely chopped coriander
  • Oil for frying
  • Sugar to taste
  • Salt to taste
  • Water
METHOD: 
  • Wash potatoes properly. Peel them and prick them with a toothpick or fork so that they can absorb all the masalas.
  • Heat oil in a pan and deep fry the potatoes till they are almost golden red at least around the edges. 
  • Par boil the potatoes in a pan or steam in pressure cooker. You can add some salt to the water. 
  • Next, take a small bowl and mix the ginger paste, chili paste, yoghurt, kashmiri chili powder, a pinch of asafoetida and coriander powder with a little bit of water.
  • Heat oil in a kadai or a pan. Add cloves, cardamom, cinnamon and bay leaves.
  • Saute for a few seconds and add the mixture that you just prepared. Saute again.
  • Add 2 cups of water to the mix and some salt to taste. 
  • When the water starts boiling, add the potatoes and stir properly. 
  • Add shah jeera and mix again.
  • Cover the pan/kadai with a lid and let it simmer for 15-20 mins or as long as it takes to thicken the gravy.
  • When the oil starts floating on the sides and the potatoes have absorbed the gravy, add the sugar, garam masala, finely chopped coriander and stir again.
  • Let it simmer for a few minutes and turn off the heat.
  • Leave it covered for a little while and then serve hot with Dalpoorie or paratha. 
FOR DALPOORIES YOU WILL NEED: 
  • Chana dal
  • Ajwain ground to powder
  • Flour
  • Oil
  • Water

To make the stuffing for dalpoorie: 
  • Soak the chana dal overnight in water.
  • Drain the water and make a paste out of the chana dal.
  • Heat a kadai and add the paste. Keep stirring until it becomes dry. 
  • Add a pinch of salt and sugar.
  • Grind the ajwain to a powder and add to the dal paste.
  • Stir well for a minute or two and take it off the heat.


Use this mixture as stuffing. Make the poories and fry them hot just like we did for our Radhaballavis


You can write to us at the2brokegirlz@gmail.com
Enjoy the pujas!

Sunday, October 6, 2013

CHOCOLATE WALNUT BROWNIES


In my childhood, I remember, when my father would go to Kolkata on (most of the) saturdays for meetings and other work, my sister and I just couldn't wait for Daddy to return, because we knew he would be bringing home Brownies from Nahoum's (in New Market). Not much has changed though we've grown up. The waiting is just the same. Growing up in the suburbs, we knew what cakes were and loved them, but Brownies were like special cakes from heaven! Today it's so popular that it is everywhere. So, why would one take the trouble of making Brownies at home? I'd say, for the sheer joy of baking, and the most amazing aroma that will waft away from your kitchen. I thank God that someone somewhere made a mistake many many years ago, and thus, we have Brownies.

Here's what you will need:

  • Butter - 200 gms + a little bit for greasing the baking tin,
  • Cocoa powder - 1/2 cup (the unsweetened one),
  • Sugar - 1 1/4th cup,
  • Eggs - 3,
  • Vanilla essence - 2tsp (if you have real vanilla extract, please use that),
  • Flour - 1/2 cup,
  • Walnuts - 3/4th cup (chopped).
You will also need Tin foil and a 9"x 9" baking dish, as brownies usually come in squares. But don't worry if you don't have a square baking dish. I made it in a round one, and it tastes just as good.

To make the Brownies :


  • Pre-heat your oven to 180°C. 
  • Line the baking dish with tin foil, grease it with butter, and dust it lightly with flour.
  • If you don't have superfine / caster sugar, powder the sugar in your food processor. It makes mixing a lot easier.
  • Melt the butter in the microwave for 20 secs. 
  • In a large bowl, add butter and sugar, and cream it (mix it to form a smooth paste).
  • Break in the eggs, add vanilla, and whisk. Add the flour, and whisk again. There should be no lumps.
  • Add the chopped walnuts and mix in.
  • Pour the batter into the prepared tin.
  • Scrape in all of the batter with a spatula.
  • Bake at 180°C for 30 mins.
  • Unlike cakes, when you test the brownie with a scewer to see if it is done, the skewer should have crumbs on it.
  • Allow it to cool completely on a wire rack.


Since no raising agent has been used in this recipe, the centre of the brownies will be fudgy. 
Cut into pieces and enjoy!

Write to us how much you enjoyed this tasty dish! Mail us at the2brokegirlz@gmail.com

Ciao!

Thursday, October 3, 2013

RADHABALLAVI with ALOOR DOM


Radhaballavi is a quintessential Bengali dish that we make for special sunday breakfast, for dinner, for any pujo, and even in our wedding feasts. I have some fond memories of eating Radhaballavi. My mum makes the most amazing ones (I learnt making these from her), and my group of friends and I used to have Radhaballavis after class from a sweet shop near my college. At home we always had Radhaballavi with Aloordom, and like every child, I'd say, my mum makes the best Aloordom. This dish is very close to my heart, so I thought I'd share it with you.


Let's start with the STUFFING required for our Radhaballavi. You will need:

  • Urad dal - 1 x a 250 ml cup (washed, and soaked overnight, or atleast 6hrs.),
  • Ginger paste - 2 tbsp,
  • Green chillies - 4 (the long ones, for more flavour and less heat),
  • Salt,
  • Hing - 1 tsp,
  • Ghee - 4 tbsp,

...and to make a spice blend you need:
  • Cumin seeds - 3 tbsp,
  • Fennel seeds - 3 tbsp,
  • Bay leaves - 2 or 3,
  • Dried red chillies - 4.
In a frying pan, dry roast the cumin seeds, fennel seeds, bay leaves, and red chillies, on a low heat till they slightly change colour and become very fragrant. Transfer to a dish, and allow it to cool. Then grind it in your food processor into a fine powder. Store in an air-tight box.


  • Drain the urad dal, and grind it with the green chillies, adding little water, just enough to keep your food processor moving.
  • Heat ghee in a kadhai. Add the ginger paste and fry for a few seconds. Then add the hing, and stir in for a couple of seconds. Now add the urad dal mix, and the salt (according to your taste). Keep stirring the dal mixture. It will get very sticky and lumpy. Just keep going at it. This will take a good 15-20 mins.
  • Turn the gas off when the mixture begins to leave the sides of the kadhai. Transfer into a bowl, and allow it to cool down to room temperature.
  • Add around 2 tbsp of the dry roasted spice powder (its called the 'bhaja moshla') to the dal mixture, and mix in. This mixture will still have hard lumps in it, and if you try to make the Radhaballavi with the stuffing as it is, the dough will tear when you'll try to roll it out.
So, what I do is, I take as much amount of mixture as I'd be needing at the moment, and give it a whiz in the spice grinding / chutney jar of the food processor, and there you have it, a fine lump free powder of the stuffing.
The rest of the dal stuffing that you won't be needing can be stored in the freezer in an air-tight box for up to a month.


For the dough:
  • Take a cup of tepid water, and add a tablespoon of sugar, and a teaspoon of salt to it. Stir in to dissolve.
  • Take your all purpose flour in a bowl, add a tablespoon or so of veg. oil to it, and knead it with the cup of water. Adiust the amount of water according to the amount of flour.
  • Form a smooth ball of the dough, and apply a film of oil on it to avoid drying out. cover the bowl with a tea towel, and a lid over it. Allow it to rest for 20-30 mins.
  • Cut out a portion of the dough (double the size than you'd need to make a roti), flatten it with your hand, fill in more or less 2 teaspoon of the dal mixture, seal and roll in between your palms to make a smooth ball.
  • Roll it out into the size of a regular roti, taking care not to tear the dough. Try to roll out thinly more at the edges than at the centre.
  • Heat 700 ml to a litre of veg. oil (depending on the size) in a Kadhai. Fry the Radhaballavis into golden perfection.


For the Aloor dom, you need:
  • Potatoes - 6 large ones, peeled and cut into 4 pieces,
  • Mustard Oil - 2 tbsp + for deep frying,
  • Ghee - 2 tbsp,
  • Turmeric - 2 tsp,
  • Cumin Seeds - 1 tsp,.
  • Bay leaves - 2 to 3,
  • Dried red chillies - 4 (kept whole),
  • Ginger paste - 2 tbsp,
  • Hing - 1 tsp,
  • Yoghurt - 250 ml,
  • Cumin powder - 1 1/2 tsp,
  • Kashmiri red chilli powder - 1 1/2 tsp,
  • Red chilli powder - 1/2 to 1 tsp,
  • Sugar - 1 tbsp,
  • Salt,
  • Shahi garam masala - 1 to 1 1/2 tsp.

You can use a store bought Shahi Garam Masala, or make your own by dry roasting 3 tbsp Green Cardamom, 2 tbsp Cloves, four 2" pieces of Cinnamon, 4 Black Cardamoms, 2 whole Nutmeg, 2 tbsp of Mace, 2 Star Anise, and 2 Bay Leaves in a frying pan, over low heat. Allow it to cool. Then grind it into a fine powder. Store in an air-tight box.


Making the Aloor dom:

  • Add some salt and turmeric to the potatoes and mix well coating each potato with it. Deep fry the potatoes in mustard oil till light golden brown. Remove with a slotted spoon and drain on paper towels.
  • Heat 2 tbsp of mustard oil and 2 tbsp of ghee in a Kadhai over low heat. Add the cumin seeds, bay leaves, and red chillies. Saute for a while.
  • When the red chillies turn brown, remove them (just the chillies), and add the ginger paste. Cook off for a minute, and add the hing and the turmeric powder. Stir in for a couple of seconds and take the kadhai off the heat.
  • Now add the yoghurt, and mix in. Bring it back on heat. Add the Kashmiri chilli powder and mix in. Turn the heat up and keep stirring till the mixture reduces, and the oil seperates and begin to float on top. Now add the sugar, red chilli powder, and the cumin powder, and mix in till the sugar dissolves.
  • Add around 300ml of water to the kadhai, and salt (according to your taste), and stir it all in. Now add the fried potatoes and bring it up to a boil.
  • When it begins to boil, clamp on a lid, turn the heat down, and let it simmer for 15 mins., or till the potatoes are done.
  • Turn the heat off, ad sprinkle over the Shahi Garam Masala, and let it sit covered till you serve.
Hope you guys enjoyed making and of course serving up this tasty dish.
Do write to us at the2brokegirlz@gmail.com


Friday, September 27, 2013

MELON DELIGHT by APARAJITA


Aparajita Chakraborty is a lecturer in sociology at Scottish Church College, Kolkata. The vibrant lady that she is, Aparajita loves cooking, travelling, dancing, music and of course chilling out (adda) with friends, that is when she's not busy taking care of  her family, which includes, among others, her husband, who by the way, is also a real foodie like her. 
Today, Aparajita has decided to share a quick and hassle free mocktail recipe, which is delicious, refreshing and healthy all at once, with the promise that she will be back with more delicacies! 
Until then, here's a cool and refreshing MELON DELIGHT for all you guys!


YOU WILL NEED:

  • 2 large pieces of watermelon (peeled, sliced and de-seeded)
  • 2 medium sized cucumber (peeled and sliced)
  • 1 inch piece of ginger (peeled and diced)
  • Salt and pepper 
  • Ice cubes


  • HOW TO PROCEED:
    • Peel, de-seed and slice the melon, cucumber and ginger.
    • Blend all the ingredients together in the juicer.
    • Strain the juice well.
    • Season with salt and pepper.
    • Serve with ice cubes and garnish with cucumber slices or mint leaves (as you please)
    Enjoy your cool glass of MELON DELIGHT and get refreshed!! And yes, it's great for your system too. Glowing skin and all ;)

    Do let us know your thoughts about this recipe.
    You can write to us at the2brokegirlz@gmail.com
    Enjoy your day!